Overview
You want a county code to be added to (or updated for) an account and an enrollment resubmitted to the utility.
Solution
Please raise a support ticket with us (if not done already) providing the LDC Account Number, customer name, and county code. You may provide a specific start (switch) date, if applicable.
We will add/update the county code, submit enrollment and inform you.
<supportagent>
Pre-requisite
-
Write-access to the Client (CIS) database
- Access to the client-specific CSR site
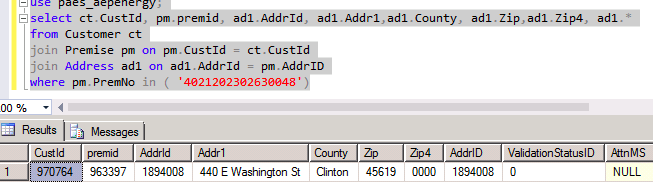
1. Run a query to get the address details for an account. Replace the parameter PremNo using the provided LDC Account Number.
use paes_aepenergy;

select ct.CustId, pm.premid, ad1.AddrId, ad1.Addr1,ad1.County, ad1.Zip,ad1.Zip4,
ad1.*
from Customer ct
join Premise pm on pm.CustId = ct.CustId
join Address ad1 on ad1.AddrId = pm.AddrID
where pm.PremNo in ( '4021202302630048')
2. Update the address for the given account with the provided county by running the following query. Replace the parameter AddrID with the value from the previous query result.
update Address set County = 'ABCD' where AddrId=1894008;
- Log into the client-specific CSR site.
- Search for the Customer account using the Search section in the top right corner of the screen. Select LDC Account Number from the drop-down, enter the client-provided LDC Account Number, click on the Search option.
- Navigate to the Utility Accounts tab and select Create Market Transaction.

-
- Depending on the utility that the customer/account belongs to, the options on this screen will vary.
For example, a utility may have the Customer Enrollment option (Sample 1), or it may have the Enrollment/Switch Request option (Sample 2).

Sample 1
- Depending on the utility that the customer/account belongs to, the options on this screen will vary.

Sample 2
Select Customer Enrollment or Enrollment/Switch Request, depending on the available option.
Click on Continue.
- Depending on the utility that the customer/account belongs to, the options on this screen will vary.
For example, a utility may have the Transaction: Enrollment Request (814_E) option (Sample 1), or it may have the Transaction: Enrollment/Switch Request (814_01) option (Sample 2).

Sample 1

Sample 2
If the Transaction: Enrollment Request (814_E) option is available, click on Send Transaction.
If the Transaction: Enrollment/Switch Request (814_01) option is available, select the Switch Date provided by the client. Click on Continue. In the next screen, click on Send Transaction.
Testing
Once an enrollment transaction has been submitted, you can monitor the response from the utility. It is expected that an incoming 814 (814_E, 814_01) transaction will be received and the account status will be changed to Enrollment Accepted. This confirms that the enrollment has been accepted.
Steps
- Log in to the client-specific CSR portal.
- Search for the Customer account using the Search section in the top right corner of the screen. Select LDC Account No from the drop-down, enter the client-provided LDC account number, click on the Search option.
- Once the search result loads, check the status of the Account at the top of the dashboard. It is expected to have the value Enrollment Accepted displayed.
- Under the Utility Accounts Tab, click on the "View Transaction History" icon.
- Get the most recent transaction by selecting a recent date range for Date From and Date To, Type as 814, and click on Search.
- In the resultant information displayed, there should be a transaction or record with the values for the columns Direction as 'In', Type as '814_E'.
The "Effective Date" will be displayed in the Key Fied and Key Data columns.

Priyanka Bhotika
Comments